| History
Final
Cut Pro is a video editing software made by Apple. It was introduced around
1998 and is now in version 5. Previous versions
were 1.0, 1.2, 1.2.1, and 1.2.5, 2.0, 2.0.2, 3.0, and 3.0.1, 3.0.2 and
3.0.4, 4.0, 4.0.1, 4.0.2, 4.1, 4.1.1, 4.5 HD.
Final Cut Pro is also called FCP.
FCP got a lot of people excited because here, for the first time was an
edit system that had many of the features found only on high-end systems
like Avid or Media 100. There are also some keyboard shortcuts that are
common to Avid Media Composer. The software itself costs very little,
and even if you add the cost of the Mac that's needed to run it on, it's
still doesn't come close to what an Avid costs.
In fact a full fledged offline FCP edit system with hours of storage costs
less than a Maruti 800. And even a full blown uncompressed video solution would cost less than a luxury car.
|
|
FCP is not a system is the same sense that Avid or Media 100 are systems. FCP is only software. You need a Mac, a capture card and some extra hard disks to use FCP.
|
| How
does FCP work, meaning how does it feel like to edit ?
When
I began working on FCP I had been editing on an Avid Media Composer for many years. So
I'll try and report what it feels like if you're coming to FCP from
an Avid.
First
the interface.
In an Avid one is used to two monitors. On the left monitor one sees bins
and the project window. On the right monitor there is the source and record
windows and below them, the timeline.
In FCP if you are working with a single monitor (FCP can work with two
as well, but I'll describe a single monitor situation here) you see 4 "windows". They fill up the screen. They're called viewer, canvas, browser,
and timeline. It looks sort of like an Avid's right monitor, with the
timeline window shrunk in width to accomodate a window that contains the
bins.
It
looks like this ...
|
|
|
|
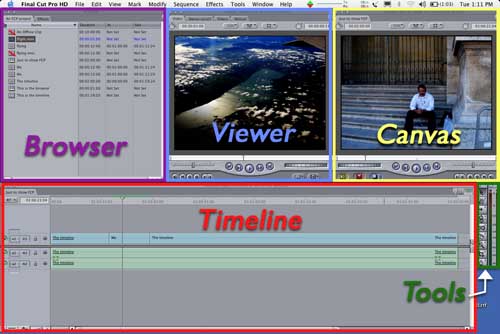
This is a single display arrangement. If you have two displays, you can move the browser and all bin windows to the left display and the Viewer, Canvas, Timeline, tools and audio level meters to the right display. |
|
The
blue, yellow, purple, red, and green outlines have been made by me and are
not part of the interface.
Also,
what you're seeing here is the "standard" arrangement that's default when
you start up for the first time.
You can modify this to your heart's content. And you can also resize each of these windows an arrange their positions and
then save any number of such arrangements. |
To the left of the Viewer is the browser (purple in the picture) and at the bottom is the timeline (red in
the picture).
The browser shows you all your bins as little folders that you can expand
to see their contents. You can make as many bins as you need and even bins inside bins. You can put whatever you want inside these bins and even drag and move things between bins.
You can open bins as separate windows and also as a tab in the main browser window (Option-double click)
The browser also has sections containing
video effects and filters. This is like the effects pallette in Avid. Effects are arranged as types - transitions, filters, audio filters etc.
And unlike Avid, you can open more than one project at a time and move and copy between projects. Each project opens in its own tab in the browser.
These bins and their contents are not visible outside FCP. So, an FCP project abbears like a single file. On the other hand each Avid bin is visible as a file outside Avid.
|
|
The
browser is like the project window in Avid. But in Avid, you need to double-click
and open each bin to see it's contents.
In FCP you can just expand the bin to see it's contents. |
The
timeline in FCP is like Avid's timeline, and you can increase and decrease
track height, see a rubberbandable line showing levels
if you wish, audio waveforms, thumbnails etc. And you can save your preferred timeline layouts.
There's also a small toolbar showing various editing tools. The range and
variety of tools is not as extensive as in Avid. But most editing functions
are covered. And there are even tools that you wished you had in Avid. (More
on that later)
And you can create your own preferred toolbar just above the timeline and also another one just above the Viewer, Canvas and even a button bar in the browser.
To customize this "button bar", you can search for menu items and commands and then drag and drop them to make a custom button bar. This can be saved and taken to another system. |
|
In
Avid one is used to having often used tools as a row of buttons below the
screen in the source and record monitors.
And there are also tear-away "hamburger" menus just above the source and
record monitors.
|
The
viewer (blue in the picture) and canvas (yellow in the picture) are sort
of like the source and record monitors in an Avid. But only sort of.
If you look closely the viewer has tabs or sections called Video, Audio,
Filters, and Motion.
If
you select the Video tab, you can play a clip. Just like the source monitor
in Avid. You can also see the time code and the in-out duration.
If
you select the Audio tab, you can see audio waveforms for the audio part
of the clip. You can adjust the levels and pan for that clip here. And even keyframe this level control in the source.
If
you select the filters tab lets you can adjust any filters you may apply
to the clip. Filters are another name for what we call effects in Avid.
And filters are available in the Filters tab in the browser. And yes,
you can add filters to a clip in the source. In Avid you can add effects
only in a sequence.
If
you select the motion tab you can control parameters like size, rotation,
opacity, crop, border etc. These too can be added to a clip in the source.
|
|
Think
of filters like effects that one drags and drops on a clip in an Avid.
Except that in Avid you can add an effect only in a sequence. In FCP you can add an effect to a clip in the timeline, of course, but you can also add an effect to a clip, so whenever you use the clip it comes with the effect. |
But
the best part is that for each of these filters, you can control different
parameters via different sets of keyframes. Unlike in older Avids, where if you
put a resize on a clip, and control the size over time with two key frames,
and then want to control crop over different points in time, you can't.
Also, like I said earlier, in FCP you can add an effect to a clip in the
viewer (source) also. If you add a filter to a clip in the viewer, then
that clip will always have that effect every time you use it. That you can't
do in Avid.
|
|
This
thing about adding an effect to a clip before you use it in a sequence has
uses. If you had a series of clips that you always wanted to use as black
& white or funky colours, you could add the effect to the clip, so whenever
you used it, it would come with the effect attached. |
Quick
start guide to FCP - for Avid editors
- You can start FCP by double-clicking it's icon, or you can double-click a project and FCP starts with that project open.
- In OSX systems FCP is available on the dock and a single-click starts it.
- If you double-click the FCP icon, then FCP opens with the last open project, or if no project was open, then a new project is created. In this new project there's also a new sequence
called "Sequence 1".
- After you've worked with FCP for a while, you'll find that whenever you start
FCP it starts in the last state. Meaning it opens all projects and sequences
that were open when you last quit. You can change this behaviour.
- When
you create a new project, you need to specify settings for that project and the blank sequence that is created.
- You can open more than one project at a time. Really convenient.
- Sequences can have any setting from web movie 320x240 all the way up to HD 1920x1080 pixels. So you need to specify a sequence settings before you start editing in it. You can make FCP ask you for settings every time you make a sequence, or you can silence this ask.
- To
capture, you need to go to the "Log and capture" mode. This is what
we call Digitize tool in Avid.
- When
you enter digitize tool FCP doesn't ask you what tape is loaded. You
need to remember to name it. Else it's called 001. So if you capture
from the same tape many days later, be sure to name the tape what you
had earlier. You can copy the tape name from the browser and paste it into the capture tool.
- When
you change tapes, FCP warns you about it. But you can't select tapes
from a list. So you have to remember what you had called the tape earlier.
The exact same name. Else it's considered a different tape. You can however go to
the bin where you had earlier captured to, and copy the name from there.
- You can even change the tape name for one or more clips after they've been captured. And you can alter the timecode of a captured clip as well.
- You
can use the J-K-L to shuttle tape and search for in and out points.
- Before
capturing you need to set the capture settings. And you need to do this
every time you change what you're capturing from.
- You
can capture to any bin.
- You
can even log first and capture later.
- FCP
does autonumbering of clips if you need. Meaning if you call a clip
Roll 1, then the next clip is automatically
called Roll 2. You can change this, of course.
- Before
you start editing you need to create a new sequence and give it the
same settings as you set for capture. Otherwise, even cuts are not real-time.
- This
is the commonest problem in FCP. Capture settings can be changed, and
if not exactly the same as sequence settings, everything has to be rendered,
even to play.
- When working in the timeline, you need to click in the ruler at the top of the timeline to quickly go to some other oart of the sequence. In Avid you can click anywhere in the timeline.
- In FCP if you click on a clip in the timeline that clip gets selected. If you click and drag it accidentally, it moves and overwirtes anything around it.
- In FCP clicking on a clip in the timeline selects it. and dragging, moves it. So FCP is in a permanent segment mode or "red arrow" or "yellow arrow" mode.
- You
can play clips by using J-K-L and I-O for mark IN and mark OUT.
- You
can drag clips to the timeline straight from the browser.
- Or you can open them in the Viewer, mark in and out and place them with the "red arrow" for
overwrite and "yellow arrow" for insert.
- You
can also place clips in the timeline by "blue arrow" for replace. "Blue
arrow" also does "fit-to-fill" or replace on a higher layer. You can
also "replace with transition".
- You
can trim just like in Avid, one sided or overlap.
- You
can even slip and slide.
- And you can do this trim, one or two sided, slip and slide without entering any "trim mode"
- If
you put a track out-of-sync while trimming, you get a sync-out indication
just like in Avid. You can then automatically sync it by slip or slide.
You can even Control-click on the out-of-sync track and select if you
want it moved into sync or slipped into sync. Neat !
- To delete unwanted sections from the timeline, you can highlight them and press Backspace. This works like "lift" in Avid. To do a "scissor cut" you press "delete" (next to the "end" key)
- When trimming, or lifting sync relationships between tracks is prerserved. If you don't want it to be, you can lock up tracks.
- You
can apply filters (what we call effects in Avid) to a clip in the timeline.
But there are no effect icons representing what effect has been added.
- To edit parameters of an effect you double-click the clip that has an effect applied
to it. This opens in the Viewer (left monitor) where you can vary different
parameters with different keyframes. You can even add more than one
effect at a time. There's no "step-in". The effects just cascade one
on top of another just like in AfterEffects.
- When
editing effects you need to ensure that you're editing the effect you
want to. It's very easy to change parameters for an effect
without wanting to.
- There's
no entering effects edit mode and getting out of it like in Avid.
- If
you add a dissolve, you can double click it to adjust it.
- If
you switch a track's visibility, to off, then anything rendered there
is lost. You can, of course undo.
- To make a motion effect, just place the clip in the timeline, select it and change its speed.
- You
can add titles and even move, roll, crawl and rotate them with keyframes.
But each title has one font size and style. So if you want titles of
different fonts or sizes in one screen, you need to make different titles
in different layers. Sad!
- Or, you can use the Title 3D that comes free with FCP.
- Or even Livetype.
- You
can import many different graphic formats and even Photoshop files as layers.
- All
these effects have to be rendered unless you have realtime hardware.
(There's more on this on my "What
other equipment- for FCP? " page.)
- If
you create a multi-layer effect and render it you can see the whole
effect. But if you switch the track visibility to a lower track, you
lose the render. You can dupe the sequence before switching visibility,
though. Serious drawback !
- You
can have many video tracks.
- You
can trim audio and video separately.
- You
can move one or more clips in the timeline. But there's no "segment" mode like in Avid. The timeline is in a sort of a permanent segment
mode. Meaning if you click on a clip in the timeline it gets selected.
You can then slide it up down right left.
- You
can duplicate a sequence and make versions.
- You
can use a sequence as source. But if you use a sequence as source and
edit it into another sequence, it gets "nested". After that any changes
you make in the original get made in the nested one as well. This nesting behiviour can be altered.
- If
you want to use a sequence or part of it as source, you can select those
clips, an then copy and paste tham into another sequence. This paste
can be overwrite or insert. Very convenient !
- After
the edit is over, you can dump to tape in Assemble or Insert mode and
even "punch-in" to a specific time code.
- You
can set up colour bars, black and slate automatically and save these
settings.
- Finally,
you can quit without saving, in FCP. So you can
lose a lot of work by clicking on "Don't Save" when quitting.
|
|
FCP is a general-purpose software that can edit with a variety of third-party capture cards. And even without any capture card, FCP works with DV camcorders and decks as DV.
Add an uncompressed card and you're doing "online". Yes completely uncompressed 10-bit exactly as good as a new discreet smoke-fire, flint-flame-inferno.
(and better than older 8-bit smokes and Quantel Editboxes)
Incidentally, if
you are capturing from DV using Firewire, it is a direct and lossless
digital transfer, so there's no "offline"
Of
course, if you are using Analog cards, you can work in an "offline" resolution
to save space.
Anyway,
DV gives you 5 mins for every 1 GB of disk space. So if you add a 250 GB
hard disk that costs less than Rs 10,000 you can hold 16 hrs of full DV
quality footage.
Who
needs offline ?
FCP captures clips as Quicktime movies. So you can opne these outside FCP and even write them to CDs or DVDs and open them in any other computer without import or export.
You can even drag Quicktime movies captured on some other FCP system straight into FCP without having to import them.
Nearly any kind of Quicktime movie, AVI, wav, aif etc opens in FCP straightaway.
Basic parameters of any clip in the timeline can be changed by click and drag. So to resize, rotate, distort (like corner-pin), and crop a clip, you don't have to apply an effect. Just click on the corner handle and drag. Almost exactly like After Effects.
Even titles can be manipulated after being placed in the timeline by just dragging their corners. |
| |
|
|
| Keyboard
shortcuts compared to Avid
The
keyboard layout in FCP has some similarities and some differences from
Media Composer. A
complete description of the keyboard is in the manual, so I won't give
a keyboard shortcut table here. Instead, I'll just deal with some of the
keyboard shortcuts I work with. And I work alternately on an Avid and
FCP setups.
Mind that these are default keyboard settings. You can change them in to any extent and save your changes.
J-K-L.
These keys work exactly as they do in Avid. L plays forward, J plays reverse
and K pauses. Pressing L repeatedly increases the playback speed in steps.
Pressing J repeatedly does the same for reverse playback. The J-K-L keys
also work in the digitize tool to search on tape.
I-O
Mark IN and mark OUT just like Avid. There are no goto IN and goto OUT
keys. But you can Shift-I for goto IN and Shift-O for goto OUT. There
aren't even remove IN and remove OUT keys, but you can use option-I for
remove IN and option-O for remove OUT. Actually this sort of works better
once you get used to it.
Next
cut - Previous Cut
In my Avid settings I've mapped these to F4 and F3 respectively, but in
FCP they're simply Up arrow for Next Cut and down arrow for previous cut.
Or even ";" and "'" - next to "L".
But you can't set this to go to head frame only or tail frame only or
both like you can in Avid. So to go from a clip head to a clip tail in
the timeline you need to press down-arrow and right key. Also these can't
be set to "ignore track lights" like you can in Avid. The stop at the
next cut regardless. Not good.
Cmd-plus Cmd-minus
To expand or contract the timeline or the picture in the Viewer or canvas. Shift-Z makes the timeline/viewer/canvas fit to window. Mind that if the picture in the Viewer/Canvas is larger than the actual Viewer/canvas window, the clip won't play smoothly.
Cmd-Z for undo and Shift-Cmd-Z for redo.
Cmd-J for motion effect straight in the timeline. Home-End
These work just like in Avid. Meaning they take you to the head or tail
of your sequence.
Trim and extend in the timeline.
Select a cut and the "<" and ">" keys let you trim a dual-roller trim in either direction. Or select a cut and then park your timeline cursor to where you need the shot to be extended till, and press "E" to extend till there. Numeric
keypad.
With the numeric keypad you can enter any number in the tmeline and the
timeline moves there. If you select a clip and enter a number the clip
moves ahead by that many secs/frames. If you make it a negative number,
it moves backwards. If you select a clip edge and enter a number, the
clips trims out my that many secs/frames. Ditto for a negative number.
|
|
Customizable keyboard layout and button bars came to FCP only after version 4. So if you happen to use an FCP 3 or previous version, you won't see it.
|
| What
FCP has that Avid doesn't
Select
clips in the timeline without entering segment mode. Newer Avids can be set to "permanent segment mode" with clicking on the ruler to move around just like FCP.
Move clips around by entering numbers.
Trim directly without entering trim mode.
More tracks. In some Avids there are track limitations.
Source-side effects.
Source-side motion effects.
Motion effects in timeline. Great for "ramping". Newer Avids do, however support "in-timeline" motion effects.
Any settings for sequence and project. Meaning you don't have to work with
full-screen broadcast settings if you don't want to.
Cascadeable effects on a single clip and independent keyframes for different
effect parameters. (New Avids can do this, old ones couldn't)
Intelligent and partial renders mean you can stop rendering and see whatever
has been rendered till that time. Also when re-rendered only that part
unrendered is rendered not the whole thing. (New Avids can do this, old ones couldn't)
Media is Quicktime. So no export or import needed. Even for uncompressed.
Nesting of sequences and nested sequence are linked to source. So "make
once use many" can be done and changes effected in one place affect all
instances.
Multiple projects can be open at the same time and you can switch by clicking
tabs.
Multiple sequences can be open at the same time and you can switch between
them by clicking tabs. You can even copy and paste between different sequences
even if they are from different projects !
FCP comes with free apps like LiveType with which you can do anything with typed matter, SoundTrack where you can compose music, Compressor where you can compress to mpeg and other formats in the background, CinemaTools which is a film editing add-on. All these are free.Most FCP machines also have a DVD-writer drive and free DVD creation software, so mastering to DVD is standard.Direct import of Photoshop files with layers.
Some
things FCP has that XPress doesn't (but Media Composer does)
Replace
Extend
Decompose
Free slide of clips in timeline.
The latest versions of Avid XPress, does however have these features. I'm referring to Avid XPress DV version 3 and 4 which many Indian post houses still use. |
|
This
is being worked on all the time. So do check back from time to time.
Many Indian post houses and facilities still use Avid MC versions 5.5 (really!) till version 9 ot 10. And Avid XPress (ABVB-Meridien) and XPressDV version 2-4. If you have later versions some of these comments don't apply.
Many modifications to this list have been pointed out by an alert reader - Nigel Smith. Thanks Nigel. |
What
Avid has that FCP doesn't
Completely
customizable interface and settings that can be saved and transferred
to another system. Though FCP version 4 and up can do this.
A more reliable tape naming system that lets you select tape names from
a list.
A digitize tool that lets you see time code while digitizing. As well as VU meters. FCP cannot do either while digitizing.
More single button commands and all customizable.
Customizable and saveable bin views.
Super-bin.
Easier and more reliable media management. Meaning Decompose, Consolidate
and relink that works nearly all the time. In FCP you take your chances.
No settings for project frame size and frame rate means less confusion
and no rendering needed for cuts only. Ever.
Effect icon that lets you know at a glance what effect has been applied.
Tracks can be switched on and off to check out effects without having
to re-render.
An EDL manager with far more options.
A separate app for cut lists - Filmscribe that lets you make cutlists in many formats.
Multi-camera editing that works. FCP ver 5 does offer multi-camera editing only now.
|
|
|
|
